2011年2月26日 星期六

Tate Modern

  On 9th Feb, I went to Tate Modern to visit the Gabriel Orozco's exhibition.


Took a photo when I'm walking through the Millennium Bridge.


An interesting 3D Typography work displayed "outside" Tate Modern.

    Firstly, I looked around other works that are displaying in Tate Modern. I particularly find the following images interesting.


    The 2 photographs above are both photograped by Thomas Struth, who's a German photographer. He photographed visitors in some of the best known museums in Europe and America. He is fascinated by the culture of museum visiting and by the ways in which visitors and the museum respond to and affect each other. I think the light, space and architecture are all very important to both visitors and galleries themselves. I think Struth has capture all these elements in his photographs stunningly.

    As soon as I saw Struth's works, I try out what he has done on the other room. I know is nothing compare with what he has done but I think it is a interesting approach and is an interesting thing when u captured their face when they are looking at some other people's works.


    After I have looked around, I went into the Gabriel Orozco's exhibition, "GO". Unfortuately I'm not allowed to take photographys, so I just drop down some of his works' name and search the images in the internet.

"The Black Kite"


"My Hands are My Heart"


"Sand on Table"


2011年2月25日 星期五

FMP ideas

    I was busy with all the interview stuff so I haven't really start properly working on my FMP recently. Therefore I'm catching up now@@!!!

    On 7th Feb, we present our ideas for our final project. For my ideas' titles are "Illusion" and "Shadow". Here are some pics I have made in photoshop under the tile "Illusion":


    The 2 images above are from a book, 'Design Play' by viction:workshop ltd. (2009). I got inspired by the moving faces expression and I was thinking using them to represent "feeling" inside us. For example, When u looking at a thing, let say a cake, you probably have different layer of feeling inside you. You might think you wanna eat it, you might think it will make you fat, so u are not eating it...etc. Therefore, by using fade in fade out of a same person, The actual face you showed in reality will be clearly presented out. Then there're different feelings 'behind' the actual face. This is presented out by different colours depending on the your feeling, ie. angry =red, and they are more or less kind of see through because they didn't appear in the reality.

Here are some of the images I have tried out the effect of seeing through and fade in fade out: 


    In here, the image above, The actual face is the green one and the feeling of "angry" and "sad"  is kind of see-through but is there to suggest different feeling inside the body of mine.

    However, Th idea is too vague... is too fine art in some sense. Moreover, ou can only "act" out the feeling, is not real from the heart.

So now I need to think of another title for my FMP. Firstly, I think I need to go to different gallerys and read more books, then I can find what inspire me the most and what I wanted to do the most.

2011年2月23日 星期三

The Story of The Oldest Chewing Gum

 After quite a surprise success for my last project I have now got another difficult project... 

Firstly, all the graphic designers  all been told to find some facts through Internet, books or even people. Then we gathered all the facts together, lay it all out on the wall. After that we all choose which one are good and crossed all the bad ones out. Next, we all randomly picked up one by the alphabetical order of our register sheet. Kind of unfortunatlly, I got a fact called "the oldest chewing gum is 9000 years old".

First thought on my mind is, "Why am I having another sh*t titile......!!!!!!" However, things start to become better as I sketching random ideas of it out:) Here are some of my sketches:


Because this is only 1 week project, i haven't done too much thinking and sketches. I stick with "the caveman chewing bubble gum" idea.  Since a lot of people like my last video, I decided to carry on filming. And this time, I really did a stop motion video;)

1.) This is a mini studio I set up for filming the video.

2.) Some of the animation I have made for my main character.

3.) All the images and animations I have use for this video.


Here is my stop motion video. Although the animation is not that great and it is not perfect: I wish you will feel peaceful after watching thisX)))


Ferret

During the whole process of this project, it has been driving me nuts...

The starting point of the project is we all drawing out from the hat to see which animals we have got. Unfortuately, I have got "Ferret". It is a research project and it last for 2 weeks. I don't have a clue what it is and when a research it, there is nothing interesting about it.... I got so confuse by this project and I almost gave up on this.  All I did for the 1st week is some random sketches.... and there wasn't a lot sketches as well... Here some some of the sketches:


However, I was not the only one who don't know what to do. So the tutors have told us all make a zoo, make ourselves into the animal we got given and make some drama out if it. Here are the photos of that day:

The 2 photos above is the zoo we all (all the Graphic Design students in the foundation) made it together. We each quickly drew out out own animal.

The photo below is me dressed up as Ferret.....


 Others that dressed as their own animal.


The writing below just express how much I don't wanna care on doing this project.....


Luckily, I have some advise from my tutor after he has flick throw my empty sketchbook, he got "inspired" by the sketch below.


It is just a sketch that suddenly appear in my mind when I saw the fact that ferrets like to eat fish. When my tutor, Nigel saw this, he said "Why not I make a short video of me catching this thing?" Then all the ideas just exploded in my head. I then sketched out what I want in the film.


After that, I was thinking the angle of filming this out and method as well. I decided to use stop motion (kind of fail at the end) and I realised I can never do this on my own. So I found my friend to help me out by asking him to be my "Starring". Finally I made "The Ferret Hater" for the Crit on Friday. All those editing have made me stay up all night before that day. Due to the Copy Right of some of the music, I can't show it to you............ But I'll show you the one I have 'cut more things out' later.


Because this is my 1st time making and editing a video (I made this before "The Printing Machine"), This is still very scrappy and is way too long. I eventually cut it down to the one below, is still kind of too long... Although is not as funny as before but the one above is just gave people a feeling that it's going on forever....

However, people enjoy watching this and I think this is 1 of the most important thing. Now I think I need to work on a bit more on the editing side of the things and seriously need to plan it out carefully before filming it.

Here is the edited down one, hope u will enjoy it;)

2011年2月21日 星期一

The Printing Machine

After a Book Designs Project, we got given another project [it is similar to that as well, and is really what people do in "3D"], which the title of the project is "The Printing Machine".

This project we have to work in pairs, and we have to make a machine from things we collect, things through in the trash or things at your home that you don't need it anymore. Each group, each machine have to print out  a letter. My partner and I got given a letter "P" to print. The hardest bit of this project is that we only have 1 week to do so. Also due to we, as a group, both are oversea people.... which makes it even harder to find resources in this short period of time.

Though, at the end, we did find quite a few things, things like water bottles, wires, cardboard boxes, spunches....etc And luckily, we allowed to use things from other people as well, however, they are not very useful... Here ar some of the photos:


These are things form other people. The "P" shape above is made out of the plastic tubes i find on the desk. However, I didn't use it at the end....lol

So we decided to use the stuff we got to make this project work!! Here are the photos of us 2 making it=]]]:


The Machine we have made is really simple. It made out of cardboard, wires cured up to form 4 springs, spunches and the stripe at the end form my sports bag and profolio bag. It is powered by man. I'll stop talking now and show you how this machine work simply by the video below, enjoy;)


Book Designs

During the X mas holidays, we have been set to "create" 3 books from the briefing sheet. Here are some of my sketches in my sketchbook:


Because it is holidays, I didn't work as hard as I did normally. I end up only producing 2 designs out. The title for the 1st one is "The Book That Isn't There". And the other one is "The Reversing Book".

The Book That Isn't There

The idea is turning a book into a box, so when you open the book, there is nothing to read. The concept of a book is lost. so the book is really not there anymore. However, the idea of turning the book into a box is not a new idea, is actually quite an old fashion one. So by making it special, I decided I should craft some layers inside the box which I think it will make the box quite beautiful.

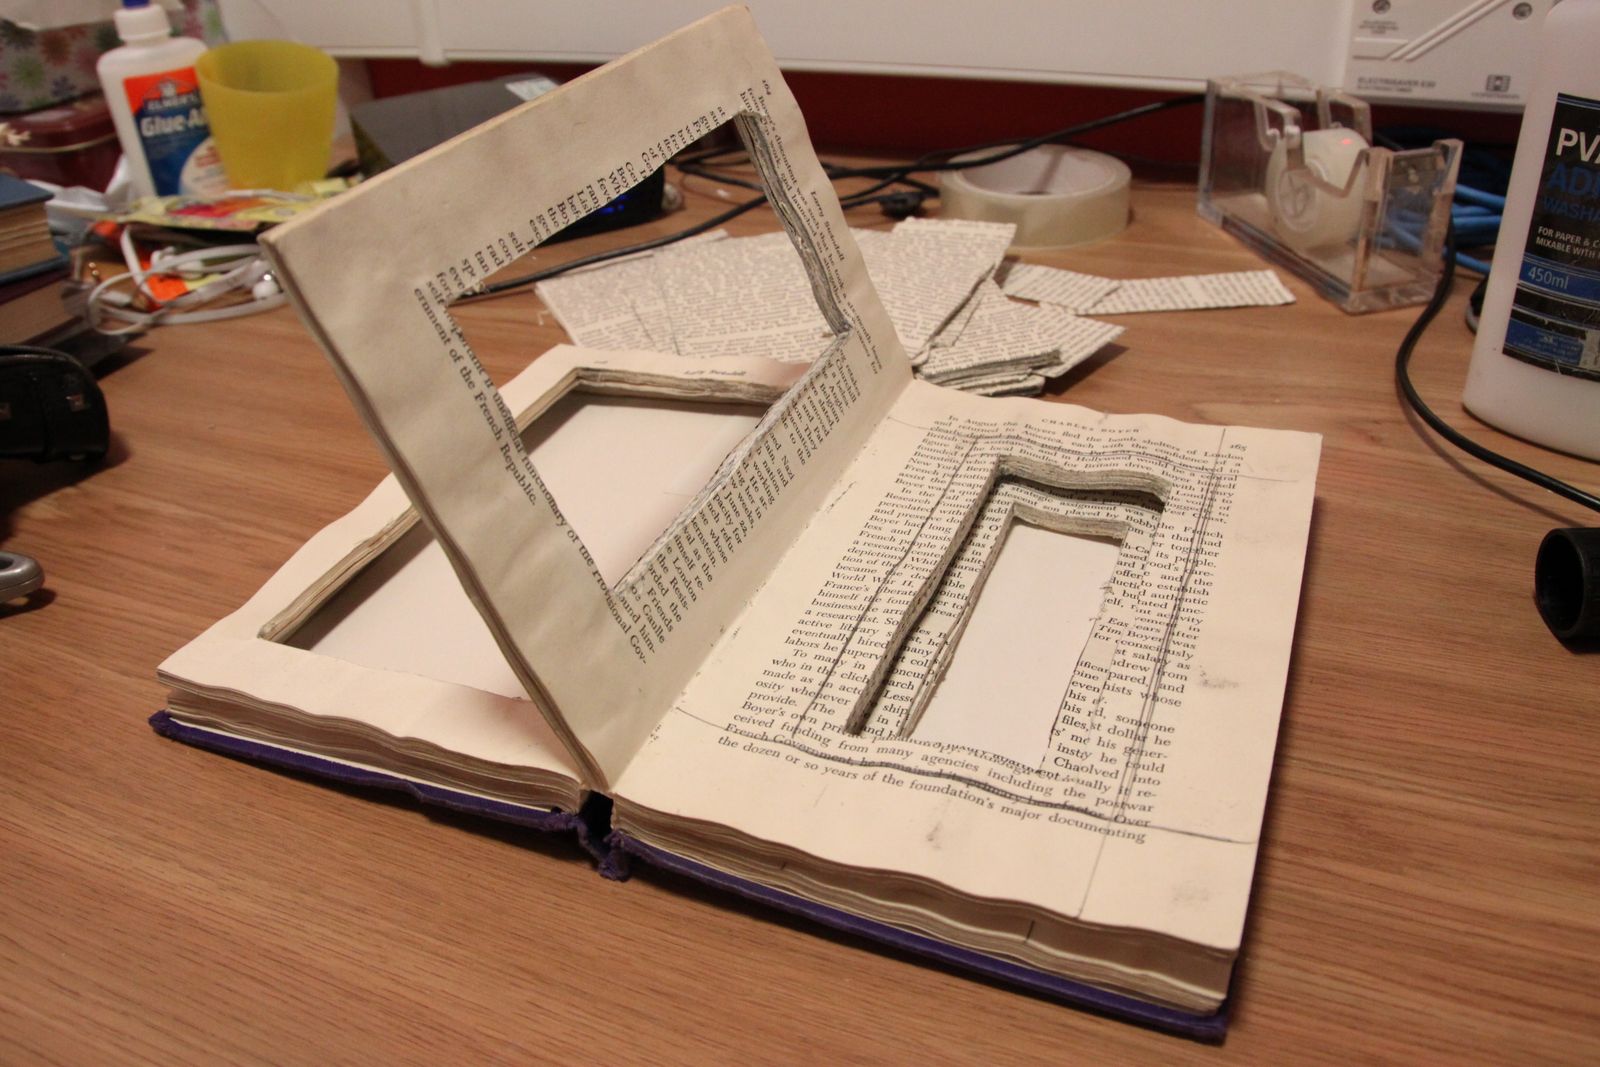
Firstly, I evenly separate "5 sections" in a book. Then I glued each section up, page by page. This is very hard work and took me ages and ages to do so. After that, I end up with 5 layers. For the layer at the start of the  'book', I cut out the biggest hole in it, then gradually cutting out a smaller hole. Therefore end up something like the photo below:


For the cutting process, It was very hard to cut them out because there are loads of glue in between each page. Also , by making it accurate, I carefully measured out the size of the holes by pencil and rule, so each of them are 5mm smaller than each other. Finally I glued the 5 layers up which finish making the box below:


Eventually, I chose to use it as a jewellery box because 'the book' is quite small and is not actually that deep. Therefore I think is perfect for a jewellery box. Though the only problem is you can't put much jewellerys in it due to the fact that 'the book' not that big...


However, because of the 1st time doing this, I haven't glue it carefully so the box is not that perfect. Beside, the book is too small orginally. Therefore, I made 1 more box from a bigger book. Here are some of the photos of that below:


The Reversing Book

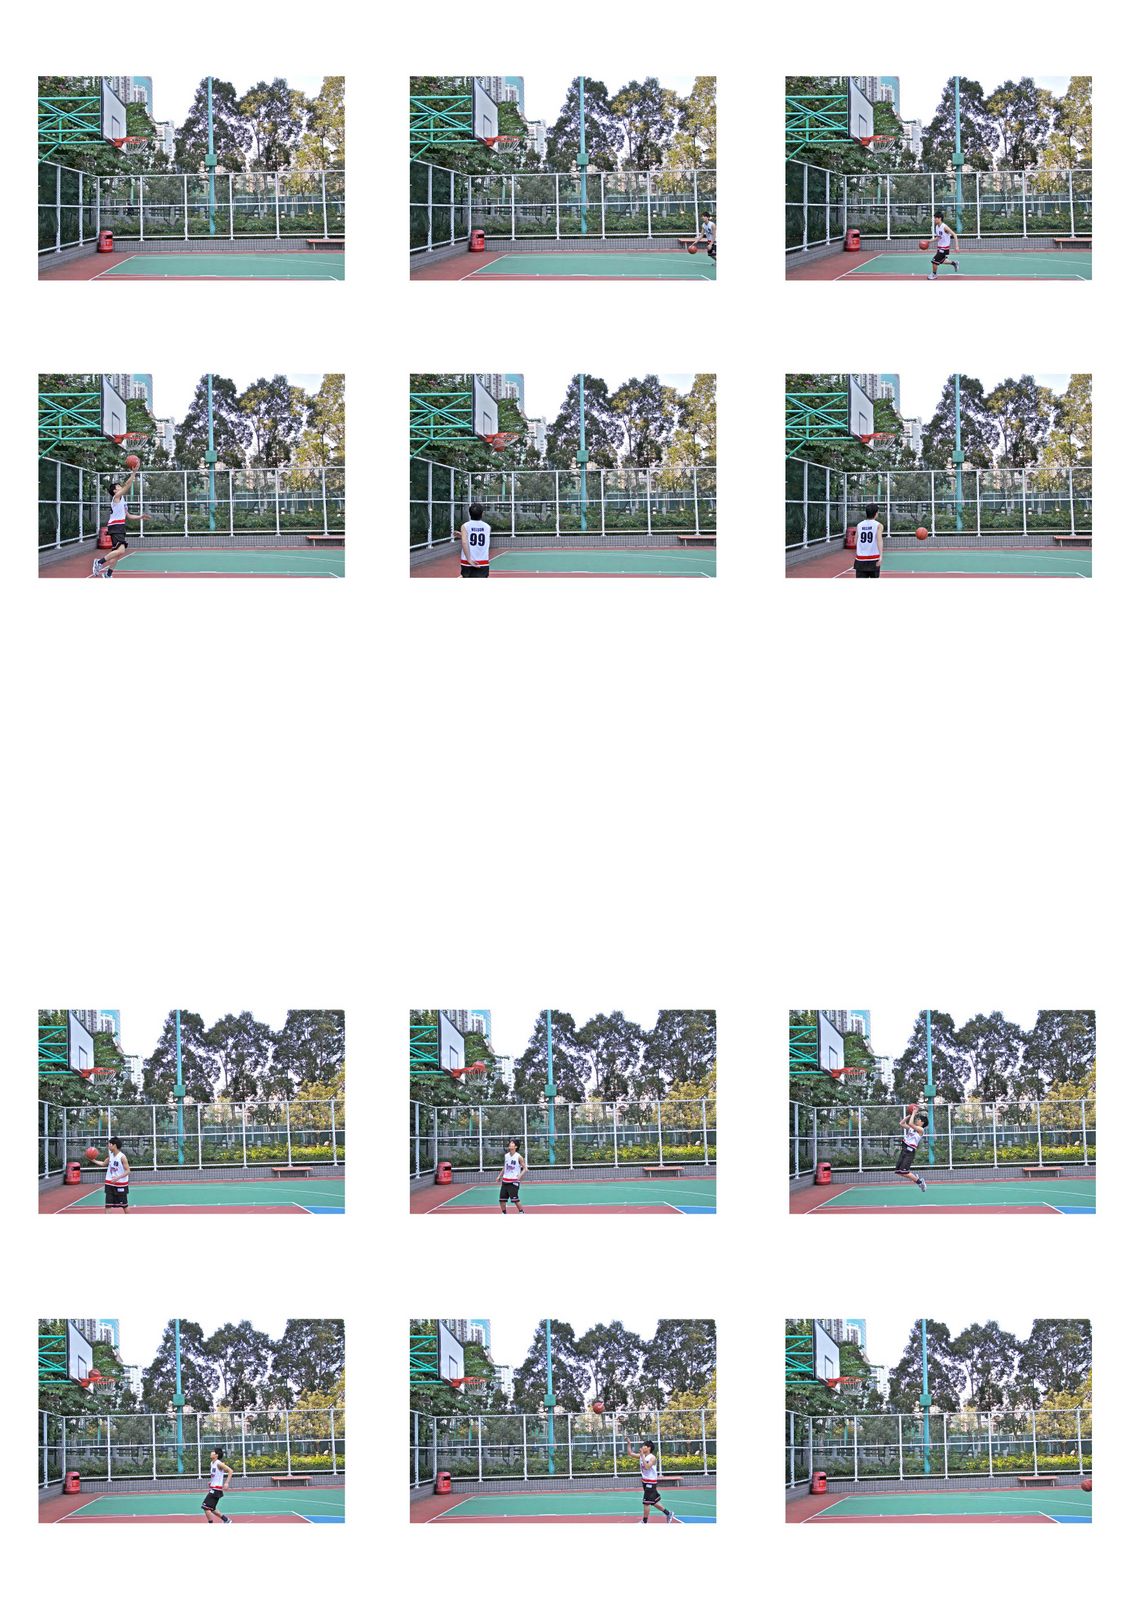
The orginally idea of this book actually came from the title called "The Slow Book". It was by taking loads of pictures of my friend doing a lay up and some tricks shooting in a basket ball court. When you printed out in photos, put them into a photo-book and 'read' it, the man in it is actually moving in a slow motion so the book became a 'Slow Book'. However, I don't think this is good enough, so I added in 1 more idea into it~ I'll let you see the photos of the 'product' 1st:


The Storyboard below is what inside the photo-book. The top half of the photo-book is the top half if the storyboard. And the bottom half of the photo-book is the bottom half of the storyboard.


Therefore, when you normally reading a book from left to right, the top half of the photo-book is actually moving the same direction. But the bottom half of the photo-book, in some sense, it is been read in a wrong direction because it is moving backwards. So you kind of having a reversing idea at the bottom half of the photo-book.